Happy Holidays!
Have you decorated for the holidays? Tom and I are busy wrapping up a few projects before joining in the season’s festivities.
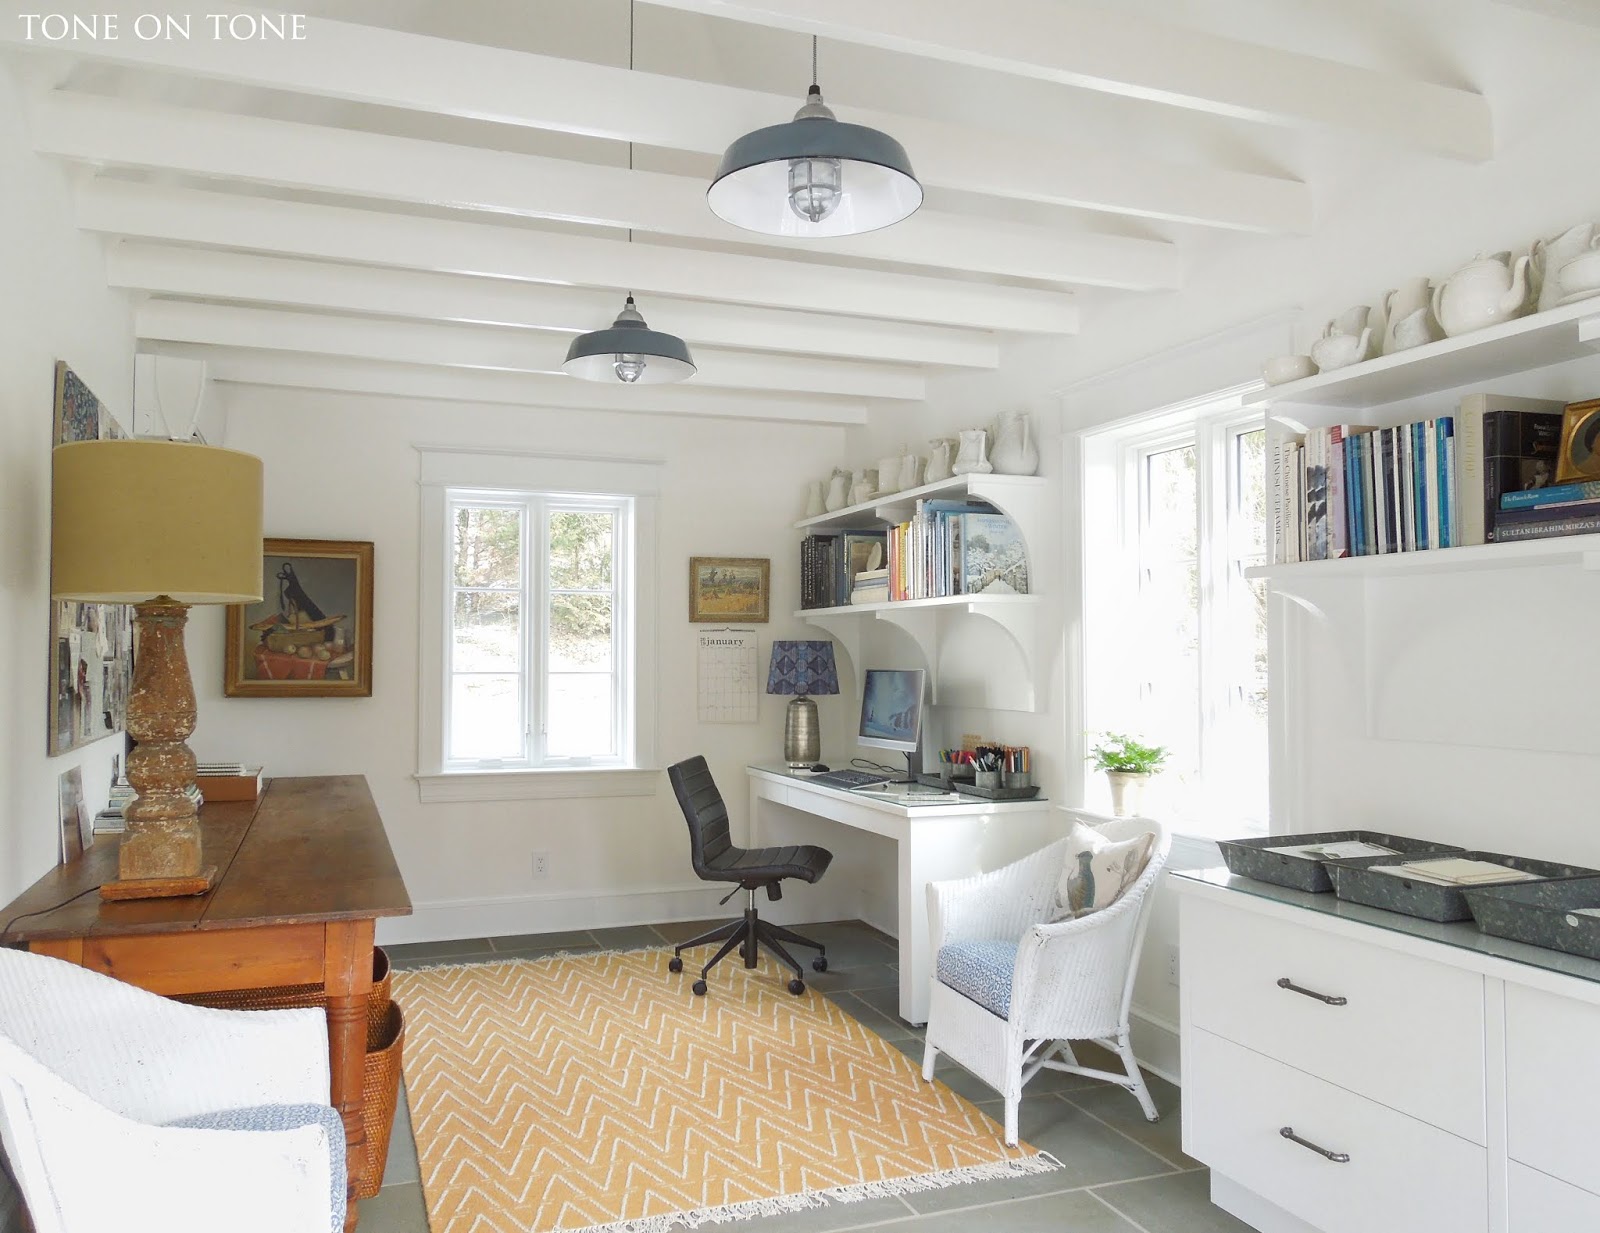
Speaking of busy, I haven’t had a lot of blog time lately – apologies! There are half a dozen posts that I started which still require photographing, more tweaking, etc. Hope to share them soon. Here is a recently completed post on a small bathroom located in an upstairs guestroom.
Our soon-to-be 100-year-old home has a total of three full baths plus a powder room. All of those were gutted during a major house renovation. While old houses captivate me, I’m not terribly excited about their vintage baths – usually with rusty pipes, dated fixtures, and cracked tiles.
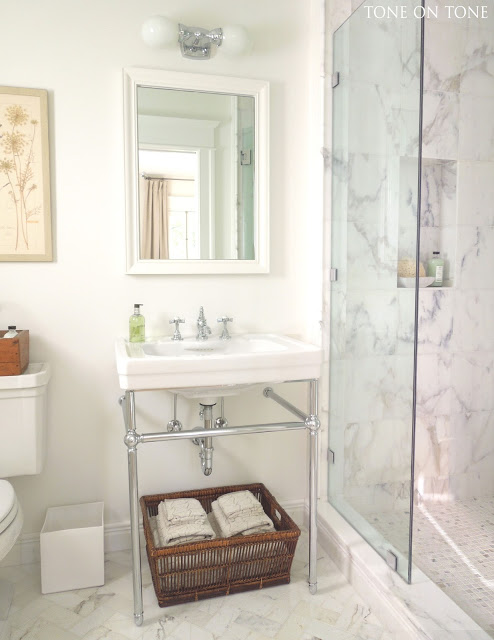
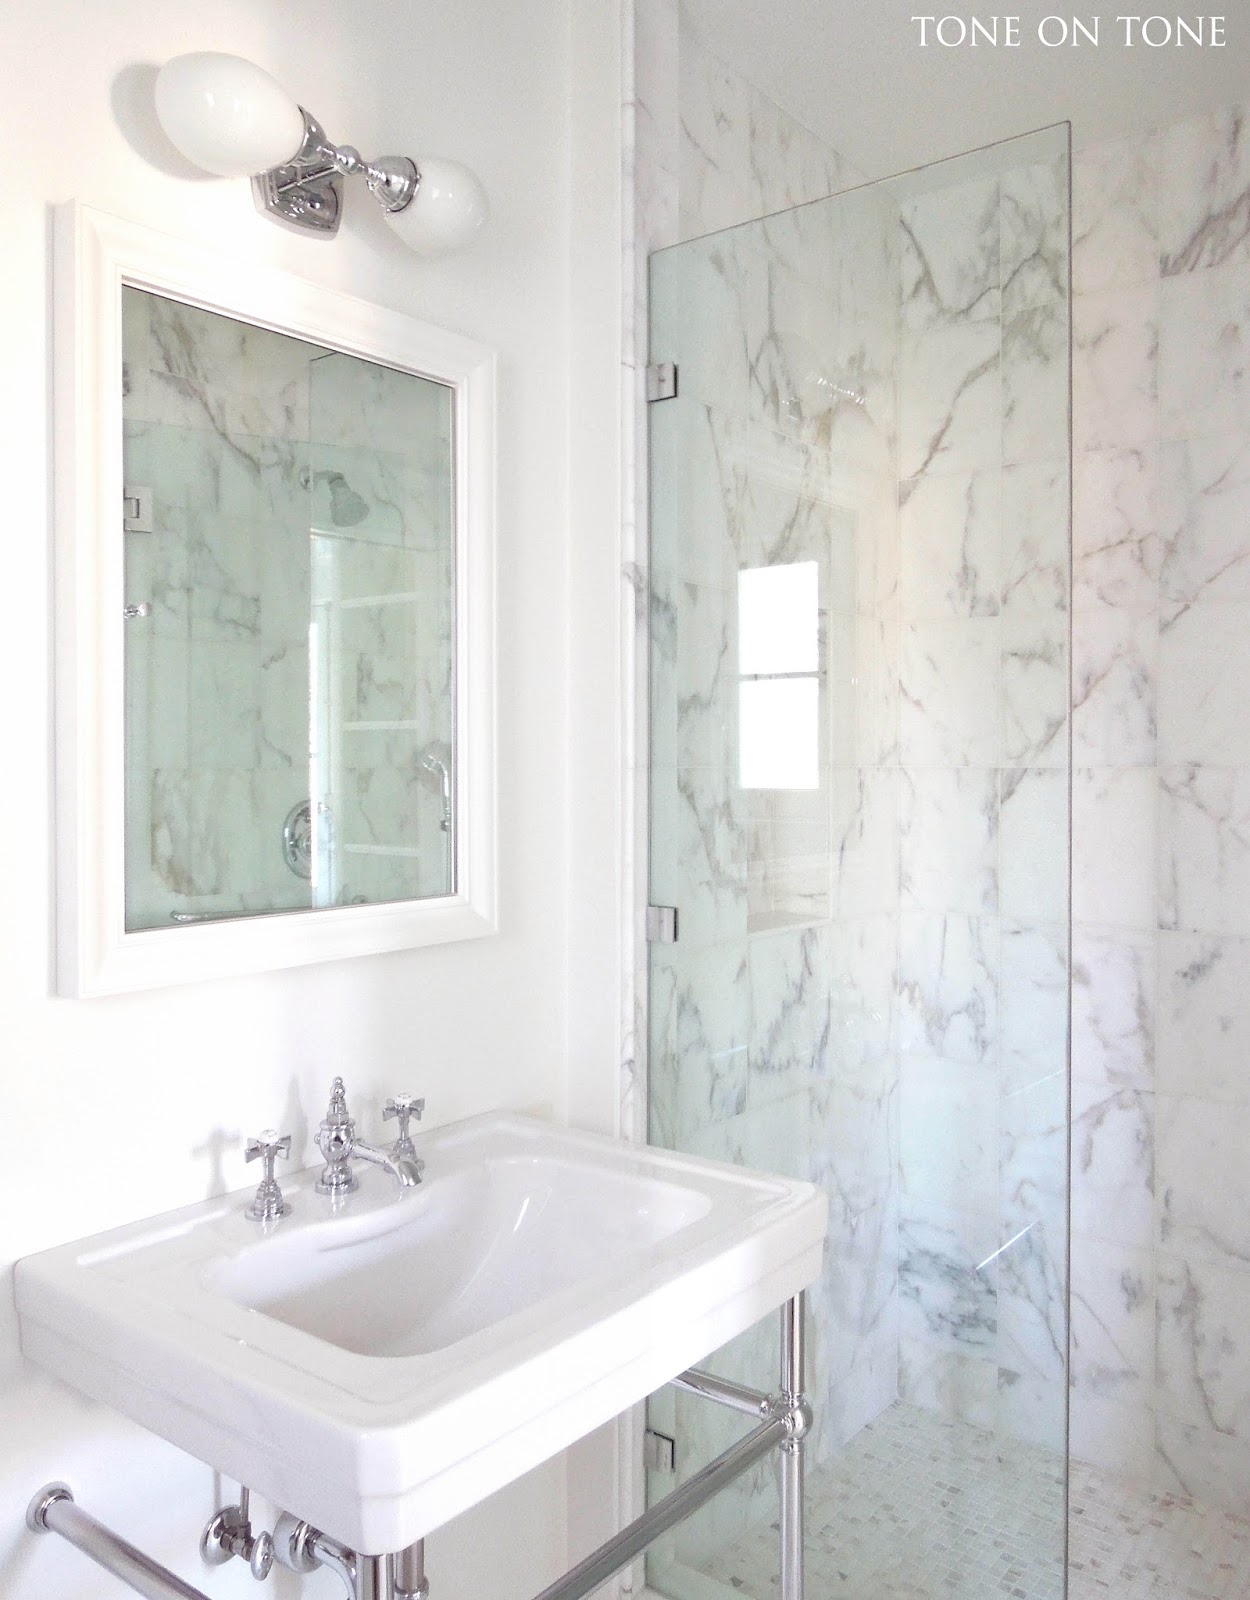
At approximately 5′ x 6′ this bathroom is compact but not tiny (compared to others in homes from the same period). Because it’s for the occasional guest (we have a private, more spacious guest suite downstairs), I renovated it sensibly yet beautifully. Storage is not an issue, by the way. So sticking with the existing footprint not only made sense, but also kept costs down and allowed splurges elsewhere. Let’s take a look.
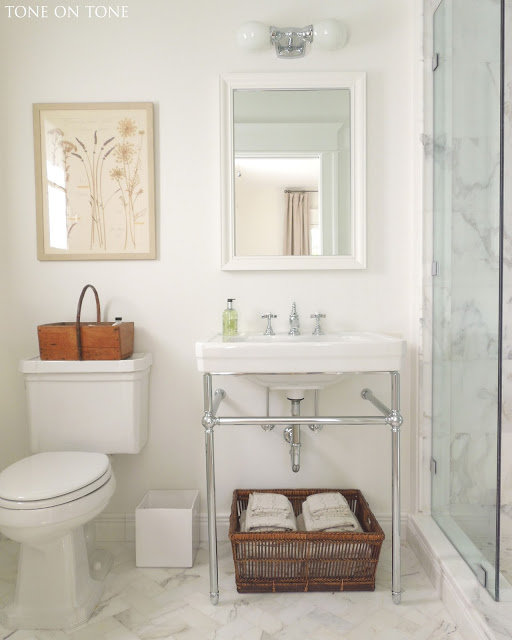
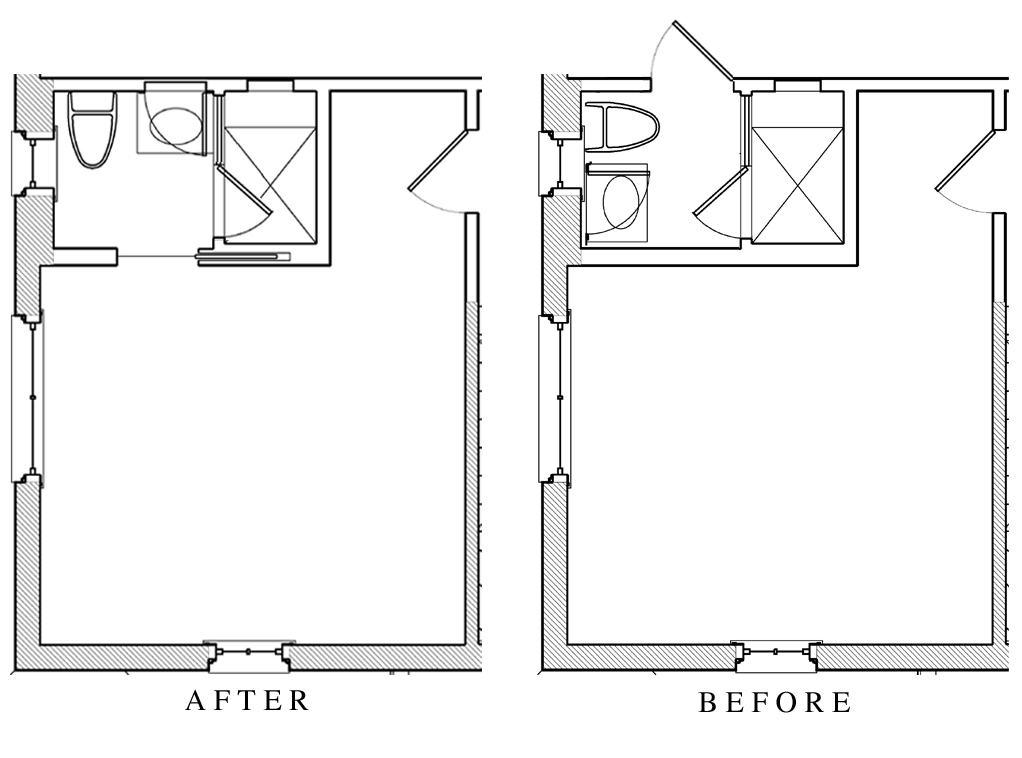
Above photo shows the bathroom after renovation, and below is before.
Here’s a breakdown of the renovation process:
-Gutted entire space.
-Converted to en-suite by connecting new entry to guestroom.
-Replaced swinging door with pocket door to better suit tight space.
-Installed all new plumbing, fixtures, fittings, lighting, and tiles.
-Relocated sink and toilet to improve flow.
-Replaced old drafty window with energy-efficient double-pane window.
Much brighter! The window size stayed the same, so what changed? Meet my friend Calacatta! Let’s chat marble.
First of all, upgrading from ceramic tile to marble did raise costs but, in a room of this scale, that increase wasn’t prohibitive.Marble is all Calacatta, which is not as gray or muddy as Carrara. Carrara is hugely popular; I do love and use it when appropriate. But the morning light of this room wanted warmer, clearer tones.
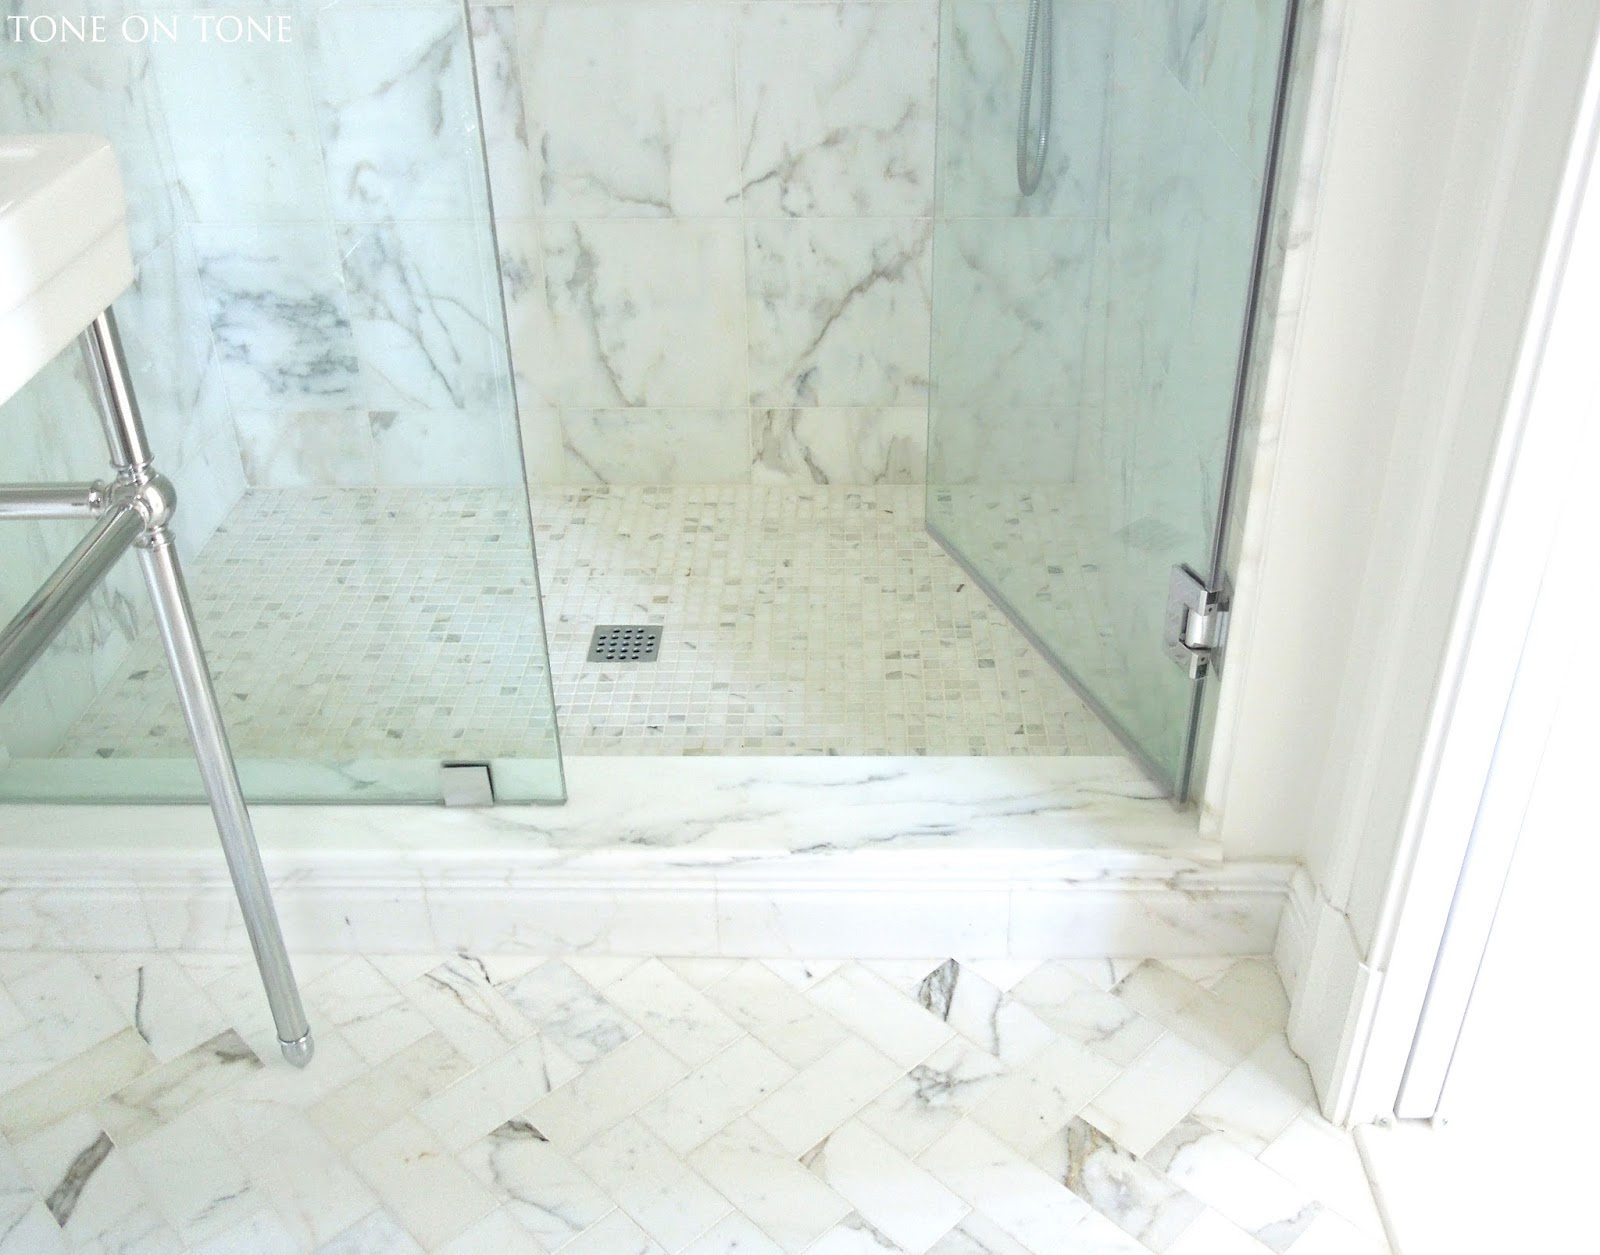
For the 40″ x 54″ shower stall, I originally selected three marble wall slabs. Then I opted for 12″ x 12″ wall tiles to make the budget friendlier, which allowed for more marble splurges: herringbone floor with 3″ x 6″ tiles, custom one-piece thresholds, carved baseboard tiles, and mosaic shower floor.Mosaic tiles work great in shower floors. Arranged on flexible sheets, those mini pieces conform well to the pitch of a shower floor. Plus the texture helps reduce slipping.
Notice the grout lines are barely visible. It’s about the marble, not the grout.
Calacatta mix. ABOVE: Floor tiles in a herringbone pattern, custom one-piece threshold, and mosaic shower floor. BELOW: Carved baseboard tiles.
Pipes and ducts were relocated to allow room for a custom soap niche as well as a recessed medicine cabinet.
Medicine cabinet is from Waterworks. I had the wooden frame painted the same color as the trim. Note its mirrored back.
Light fixture is from Pottery Barn.
Both toilet and sink are from Porcher. Since there is ample storage elsewhere in the bedroom, a console sink with open base looks lovely here – simple, clean and airy.
I’m thrilled with the transformation – our guests, too!
As 2015 comes to an end, I’d like to express my appreciation for your support, enthusiasm and visits throughout the year. And some of you made it to the shop for the first time – fun meeting in person 🙂
With many thanks and much gratitude,
Loi


Just beautiful, Loi!! Lucky guests. Happy holidays to you and Tom!
Hello Loi, This is a magnificent upgrade, with so much beautiful and well-planned marblework. The one thing I would have added would be side light fixtures on either side of the mirror–lighting from above casts the lower face in shadows. Does the shower have its own light? I like the way you relocated the electrical outlet to sink level–not so many wires flying through the air!
–Jim
Thanks so much. Appreciate your suggestion, Jim. Yes, there is lighting in the shower. Happy Holidays.
what a gorgeous bathroom… love that marble! and i hope we get to meet in person finally in 2016!
Me, too 🙂 We'd have so much to chat about. Thanks!
The bath remodel is fabulous. Great use of the space and the materials are the best!!
MC and I wish you and Tom a wonderful 2016 filled with joy and happiness.
xo
Patty
Lovely and classic!
and may i start by saying how very grateful i am to you loi for your posts and unending inspiration.
as i am seated designing a small bath, this timely post filled in the missing details. thank you my friend
debra
Thanks so much, Debra. Happy Holidays!
Be still my heart….breathtaking!…My aunt had those blue fixtures in her home and I always loved the color as we had "plain white" funny how things go….Genius in relocating the entry into the room….Love pocket doors…gained me space in my laundry room…The bathroom is exquisite and took notes on the tile as it is all so very exquisite!…but that is they way you do things…in the most exquisite ways!….Beautiful job!!….May you and Tom have a most wonderful and joyous holiday season!!!
Loi, it is perfection, beautiful! Have a wonderful and happy holiday!
Just right!! franki
Absolute perfection Loi. Keeping the base open makes the room seem more spacious, and the marble is to die for. Your designs are always on point!
We've all been waiting for a new post from you! This is so lovely: that marble is perfect as is the entire transformation. So, have you decided to stay in this house for a while? In any case, this renovation is wonderful…
Thanks, Libby! We have news on the house…..coming soon 🙂 Happy Holidays!
Je vous admire loi!!!! A bathroom reno is NOT EASY because it took our 2 years to complete. Bravo you have done it again. Gorgeous selection of materials to capture that signature style we love!!!!!
You mean you didn't love the yellow and black wall tile and the blue sink/toilet? I can't imagine why!! LOL. The remodeled bath is lovely. Marble is such a gorgeous material, but the way you've used it is what makes it so special. Beautifully done.
Claudia
It looks beautiful…
Loi, your redo project is fabulous. You give me hope for redoing our small bathrooms. Our home was built in the 30s – small rooms, small baths, and no closets! Ha! But we love older homes and make it work. I like the idea of all marble. Will work on a plan for our next project. Wishing for room for a standing tub, but not sure we can make that work without adding some space from an adjoining room.
Some day I hope to make it to DC to say hi. Happy Holidays to you!
Hugs ~ Sarah
PS
Love the mercury glass on your mantel!
Would love to meet 🙂 Please come visit!! Thanks, Sarah.
Loi, that is beautiful and bright. What a change.
Hi Loi, This is truly a magnificent renovation! Congratulations and Merry Christmas!
Thanks, Holly! Always love hearing from you. Merry, Merry!!
Loi, I just love this bathroom!! Marble is absolutely exquisite, looks so bright and clean! Beautiful renovation!
Marry Christmas and Happy Holidays to you and yours!
Vesna – Home Chic Club
Hi Loi, I love the new space. The old bath color scheme was "a bit" dated. Sending love to you both. xoxo Mary
I love the fact that you kept the gout lines and color minimal. Im sooooo over (actually never into) contrasting the grout.
You made a timeless yet current bathroom. Bravo!
Thank you! I don't like to accentuate the grout 😉
Loi,
I love it! It's funny how a few simple changes can make such a huge improvement. Everything looks wonderful.
Best to you both this holiday season.
xo,
Karen
Absolutely stunning my friend! I would love to come and visit and see this bathroom in person! I am a big fan of marble and your choice is perfect. I especially love the little shelf in the shower, we have one in our master bathroom. Thanks so much for sharing.
Hi Loi! 'Have been delving into your blog for quite a while now and finally, would like to compliment you on your sense of style. Your posts and images are always very interesting and inspiring too. Thanks for sharing these opportunities to look into your world, even from afar. Very enjoyable!
Greetings, Gerard – Thank you for your note. I appreciate it very much! Always fun "to meet" a new friend 🙂 Happy Holidays!! Cheers, L
Absolute perfection! And I loved the carved stone baseboard. Lots of good ideas here! xoxo
Lo, thanks so much for your Christmas greetings – meeting you at your phenomenal and exquisite shop was definitely a hilight of the year for us.
I love this bathroom re-do – very clean, bright and elegant. Can you give a little info on your glass doors please? Manufacturer, whether you find them easy to clean etc? We have sliding glass doors in our walk-in and I'd love to change to the swinging door – does just one side open?
Hope you both enjoy the holidays – know you will with all those lovely family and friends surrounding you, and all the good food!
Merry Christmas, happy New Year – love Mary & Bob
Mary – I still remember our meet and greet: so fun! You and Bob are very special, and I'm grateful for our friendship. The shower glass was installed by Chevy Chase Glass in Maryland. I don't know what kind of glass or the manufacturer. Cleaning is a breeze….just squeegee after each use. Merry Christmas!!
Sorry dear – of course it should have been LOI – so here's an extra holiday hug!
Mary x
Loi, you truly are a design genius and I love it!!
Fondly,
-Lisa
crazy for this bath re-do as well as everything that receives your skillful touch and killer eye. thanks for sharing this and so much lovely all year, loi. i lift a chalice of French bubbly in your honor as i am grateful for the opportunity to connect with friends i might not ever have the pleasure of knowing. the only thing that could be better? tone on tone satellite shop in chicago! a girl can dream. xox
Wouldn't that be fun? And I can come hang out with you 🙂 jingle, jingle
It's fabulous Loi! I'm crazy for Calcutta
myself. Wishing you and Tom
and the pups the most wonderful Christmas holiday with lots of love and rewarding festivities!! I hope 2016 brings us together for a few outings together-we sure flunked in 2015! Xoxo Nancy
I can't wait to hang out again! Merry Christmas, Nancy
A truly lovely and timeless transformation Loi!
xo Kat
Thanks so much, Kat! Hope you are well….miss you!
What a pretty transformation. I love Calcutta–agree it is much warmer. I also like the herringbone pattern and baseboard! Well done, as always!
Oh my goodness Loi, I love what you have created in this little bath! The Calcutta marble is perfect!
Now you need some of India's fabulous Bath and Body products, so luxurious!!
xoxo
Karena
The Arts by Karena
The India Hicks Collection!
Simply gorgeous. I love a marble bathroom. Your design is perfection!
Carved baseboards even, nothing was overlooked! Sigh… simple perfect and absolutely exquisite Loi, as always! Merry Christmas and Happy Holidays, Rié | Portobello Design Blog
Such a clean but elegant look, I am smitten with it Loi! You did a fantastic job ( no surprise considering your wonderful taste and practical sense). We also have a small bath with almost the exact footprint so you have given me some hope that it's still possible to create an attractive and useable area!
Wishing you and Tom a Merry Christmas and a Happy Holiday season!
Thanks so much. Good luck with your project. Merry, Merry 🙂
I like how you took your marble theme and ran with it … light, bright, classic, and perfect. I can't help but mourn the loss of the yellow and black tile. Not your aesthetic, I know.
We have a bath renovation of our own coming soon. Space will be deconstructed clear to the studs and brought back. No fixtures to move … nowhere to move them in the tight space. The leaky, cracked 1960s must leave to make way for new plumbing and electric. Your space gives me a few ideas to ponder.
Gorgeous small bath! So light and airy. I love it! The happiest of Holidays to you and Tom.
You sly devil! There you are leaving such a nice comment on the plans for our bathroom (which, surprise, surprise is getting increasingly more complicated) and here you've just finished up a fantastic one. I love it! You do simple perfectly.
Hi Loi,
What an absolutely perfect little bathroom! Love it all! White on White and Calacatta– Yum! And the layout is MUCH better! It's so funny, we almost used that exact sink in a powder room recently but because of a curved wall (the staircase) it didn't fit by about an inch, so we went with a pedestal. I'll look forward to getting your other posts whenever you can manage it! Happiest of Holidays to you and Tom! xoxo ~ Laurel
Well I am very late to comment on this post Loi, but what a wonderful transformation you've achieved in this tiny space. It's so light and charming. I particularly love the carved marble baseboards – not something we're able to find easily here in Australia. I just love all the subtle textural details you've made with the marble, and the choice of fittings is spot on in honouring your house's age. Have a wonderful Christmas.
This is perfection Loi! Did you use honed or polished Calacutta? I also love the faucet. Can you tell us who makes it?
Thank you! It's all honed. Faucet is from Porcher.
Fresh, bright and clean…love every square inch!! Wishing you and Tom a very Merry Christmas and all the best in the new year!!
Your guest bathroom looks beautiful Loi. Such a change from the old one. Wishing you and Tom Happy Holidays!
Madelief x
Loi, as always your designs are magical! This bathroom is beautiful and perfect! Thank you for sharing your talents and beauty with us. Happy Holidays to you and Tom and your little pups!
A very impressive transformation, as always, Loi.
Wishing you and yours cozy Christmas moments!
xo
Poppy
Thank you so much for sharing the details of this beautiful bathroom. I am wondering whether you used the 75% white dove paint color in this room? I am finding that the gray tones in white dove work well with the calacatta stone I am using, but it seems a bit dark and am thinking about trying this.
Wow, what a beautiful transformation. I could live with that bathroom as my main :).
Perfect – I can fit all of my makeup and hair products while we visit. After I'm done primping, I'll mix us up a mean cocktail!
i just love your creations and your aesthete-fab self so much, loi! this reno is so beautiful and timeless. the herringbone pattern may be my favorite, and how are we gonna talk my husband into caving and doing that for our master bath???? he doesn't touch alcohol so the seduction by bubbly is out. maybe i'll simply direct him to this post since he loves your blog too. happy new year, foxy, and don't listen to haters tellin us blogs have already gone the way of banana-clips and gauchos (i totally made that up, but whatev)…it is WE who will decide when to step away from zee keyboard, oui? xox
So tastefully done as always Loi! I love the marble and the pattern you chose for the floor and shower!
Wow! What an awesome renovation. I really love how it turned out! Just beautiful. The tiles and the colors are great too! Your bathroom looks very inviting. I would be a lucky guest!
Its really awesome. and the marble, oh really love that marble. yes its looking a magnificent upgrade.I am very sorry to say, few days ago i had hired " ipcrenocrew.ca " for water damage restoration. but hope we will meet for my Bathroom, kitchen renovation very soon.
thanks
Thank you so much for giving us such kind of handy content which will be most useful to me as well as others.
Bathroom Remodeling
This is awesome! I've been trying to do some bathroom renovation , and this gave me some great insight for things to try. Thanks for sharing!
bathrooms renovation Brisbane
Very beautiful post.. Really very nice used beautiful pictures..
Small Bathroom Renovation Ideas
Beautiful blog…
Free Standing Bathtubs Sydney
Best Bathroom Renovation Ideas
Bathroom Renovation Canberra
Bathroom Renovation Adelaide
So beautiful bathroom and home thank you for sharing us.
Thanks for BADRUMSRENOVERING STOCKHOLM I like your post 🙂
The bathroom renovation has turned out really good. I love the white colour dominating everything, as it contributes to the feeling of space. Good job, overall 🙂
Man rekommenderar för det mesta att anlita en specialiserad firma för våtutrymmen och badrum. Detta är inte ett område som passar sig för gör-det- självare, bland annat för att det finns så många regler att följa. För en ordentlig badrumsrenovering Stockholm ska man därför ta kontakt med proffsen- de som både vet vad som ska göras och har den kunskap som krävs för att få det gjort på allra bästa sätt.BADRUMSRENOVERING STOCKHOLM
För samtidigt som man vill kunna njuta av livet så är de dagliga rutinerna också viktiga. En badrumsrenovering Stockholm ska ge en ett badrum som är lättare att städa, med både material och utrustning som är lätt att ta hand om. Naturligtvis väljer du själv handfat, toalettstol och alla andra delar av rummet, och här finns det verkligen en hel del att välja mellan. BADRUMSRENOVERING STOCKHOLM
Your small bathroom renovation blog is so good and informative for me.keep it up admin.
Shower renovation manassas va
You have a very good site,This is what I exactly Looking for.thanks
Nice Blog.and Thanks for sharing such a useful information.
Thanks for sharing the work you did to remodel your bathroom.thank you for sharing us.
nice blog Dabbl is leading Shower Company provides top class products such Shower, Enclosures, Sliding Glass Doors, Shower Glass, Screen Hinge, Pivot, Frameless, Custom, Corner, Quadrant, Walk in Shower Enclosures and many more so call us now at 0086-757-88629686 email me at export2@dabbl.de Shower Enclosures, Glass Shower Doors
Thanks for your useful content. I loved those renovation images. Can you suggest me any well known bathroom renovators in Melbourne?
It's solely attainable that after the brand new ground has been put in, it's possible you'll resolve that every little thing else wasn't really so dangerous, after all. It's also a relatively straightforward do-it-your self challenge, so you'll be able to gain confidence in your capacity within the process.
bathroom steam shower bath
Thanks to share this post its all information is really very nice. Post Visit:
bathroom remodel frisco
roofing company garland tx
residential remodeling dallas
Tailoring pursuit, to just what you are looking for, is one on the very best as well as the simplest ways to occur up using the results you will need. bathroom remodeling Nothridge
I am very happy to read such a wonderful blog which gives the helpful information. thanks for sharing.
Design A Kitchen Remodel
Country Kitchen Cabinets
Bathroom Remodel
I read that Post and got it fine and informative. Please share more like that…Great Article it its really informative and innovative keep here:bathroom tilers sydney with new updates. Its was really valuable. Thanks a lot.
northern beaches tiler
I wish to show some thanks to the writer just for rescuing me from this instance. After checking throughout the internet and meeting thoughts that were not pleasant, I thought my entire life was done. Living without the solutions to the issues you have sorted out all through the article content is a serious case, as well as the kind which may have adversely affected my career if I hadn't noticed the website. Your good know-how and kindness in handling all the stuff was invaluable. I don't know what I would have done if I had not discovered such a point like this. I'm able to now look ahead to my future. Thanks for your time so much for this specialized and result oriented help. I will not think twice to suggest your web sites to any individual who desires direction about this subject matter. remodeling your bathroom
Very interesting topic, can you post some further information on this subject.
bathroom ideas austin
Excellent and helpful post… I am so glad to left comment on this. This has been a so interesting ..I appreciate your effort..
KD Plumbing Auckland
Fantastic!! This blog really convinced me. Thanks a lot for sharing us. Handyman Service in Coweta County
Handyman Service in Alpharetta
The primary reason for the change was too beat the scorching heat of the summer. The renovation Kuwait was on the rise with new forms of architecture getting in the city.
Hey, Wow all the posts are very informative for the people who visit this site. Good work! We also have a Website. Please feel free to visit our site. Thank you for sharing.
Basin Taps
Keep Posting:)
I am very glad to left comment on this blog. I really appreciate your effort. I am eagerly waiting for more updates on Renovation Kuwait.
The Baracuda has a diaphragm, as the water passes through the diaphragm it expands and contracts professor amos cleaner
love your post. love the way you explain everything about renovation . thanks for this article
Rta bathroom cabinets
I can see that you are an expert at your field! I am launching a website soon, and your information will be very useful for me.. Thanks for all your help and wishing you all the success in your business. Shower technology
This is a good post. This post gives truly quality information. I’m definitely going to look into it. Really very useful tips are provided here. Thank you so much. Keep up the good works. Read more
Excellent blog I visit this blog it's really awesome.The important thing is that in this blog content written clearly and understandable.Content of information is very informative. Thanks for excelent and great idea.keep blogging! kitchens and bathrooms
Proinstall Construction located in Elmhurst and Glen Ellyn, Illinois is full bathroom and kitchen renovation specialty company.
Your site is actually special. I've discovered your site revolutionary. You've chosen really amazing style for the drawing. We valued this. residential remodeling in dallas
It came out great! You inspire me, I think I'll do the renovation myself. I heard about Home Expert – more . Maybe I will use their help?
Buy Brick Slips from Brickslipsdirect. Large stock levels with a price match promise ensure you get the best deal on brickslips in the UK. Call 01246 260006
brick slip panels
Amazing post! I've progressively turn out to be enthusiast of the post as well as want to recommend placing a few brand new improvements to create this far better. painters in dallas
For Home Renovation company TorontoAsasa Constructions is the best home addition and renovation contractors for home improvemrnt,kitchen renovation,bathroom remodel,new home addition,basement design and finish,windows and doors in low price.
The Best and cheap price Kitchen Renovation Contractors in Toronto GTA, Asasa Kitchens caters from New Kitchen Intallation, Custom Design Kitchens, Kitchen Remodel and Refacing.ASASA kitchen products are kitchen cabnit,kitchen tiles,kitchen hood installation.
This led US companies to set up shop in China through joint ventures that are 51% owned by Chinese interests but where the majority of the profits go to the US based multinational corporations that supply the Capital and technology to make the low quality products at a competitive price.
shipping from China to Amazon FBA
For Home addition company Toronto, Asasa Constructions is the best home addition and renovation contractors for residential and Commercial in GTA.ASASA Construction offers new home addition, demolition services,bathroom renovation,basement design and finsh,hardwood floor and lamination,windows and doors and interior and exterior paint.
This type has smaller leaves which are green on the underside and it appears to be better suited to tropical conditions
shipping from China to USA
I read your post and I really like it, Thanks for sharing useful information….
Basement waterproofing Milton
Bathroom renovations Mississauga